Foundation is the backbone of any makeup look. Whether you’re creating a natural glow or a full-on glam moment, getting the foundation right is everything. If the shade is off, the coverage isn’t what they want, or it doesn’t work with their skin type—your entire look could fall flat. And let’s be honest, no MUA wants to hear, “Why does my face look orange?”
So, how do you ensure you’re always picking the perfect foundation for your clients? It’s all about paying attention to the details. Here’s your complete guide to nailing foundation selection every single time.
Step 1: Get to Know Their Skin Type Like It’s Your Own
The first thing you need to figure out is what kind of skin you’re working with. Foundation that looks flawless on one client could be a hot mess on another if their skin types are completely different.
Here’s the cheat sheet:
Dry Skin: Go for hydrating, dewy formulas. Think creamy textures with ingredients like hyaluronic acid or glycerin. Avoid matte finishes that could make their skin look even drier.
Oily Skin: Matte, oil-free foundations are your go-to. Look for long-wear formulas that control shine without clogging pores.
Combination Skin: This can be a bit trickier. Satin-finish foundations or customizable products (like mixing matte and dewy) can help balance out dry areas and oily zones.
Sensitive Skin: Stick to fragrance-free, hypoallergenic formulas to avoid any irritation. Always do a patch test if your client mentions sensitivity!
Tip for MUA: Carry a variety of primers in your kit to prep skin properly. For example, a hydrating primer for dry areas and a mattifying one for oily zones. This will ensure the foundation applies evenly and stays put.
Step 2: Nail the Undertones
Let’s talk about undertones—one of the biggest foundation deal-breakers. Even if you’ve matched the shade perfectly, if the undertone is wrong, it can make the client look off.
Warm undertones: Yellow or golden bases work best.
Cool undertones: Pink or rosy tones are ideal.
Neutral undertones: A mix of both yellow and pink.
The easiest way to check? Look at their veins. If their veins appear green, they likely have warm undertones. If they look blue, they’re cool-toned. And if it’s somewhere in between, they’re neutral.
Tip for MUA: Swatch the foundation on their jawline and check it in natural light. Indoor lighting can be deceiving, and nobody wants to walk out with a mismatched face-to-neck situation.
Step 3: Figure Out the Coverage They Want
Not every client wants full glam (sad, but true). Always ask your client about their coverage preferences. This will save you a lot of time—and prevent any “this looks too cakey” moments.
Sheer Coverage: Perfect for clients who want that “skin-but-better” look. Think tinted moisturizers or light BB creams.
Medium Coverage: This is the sweet spot for most clients—enough to even out skin tone but still looks natural.
Full Coverage: Great for clients who want that flawless, red-carpet-ready vibe. Perfect for weddings, photoshoots, or anyone who wants to cover blemishes or discoloration.
Pro Tip: Always go lighter on the coverage and build up as needed. It’s easier to add more product than to try and tone it down once it’s on.
Step 4: Prep the Skin (It’s Non-Negotiable)
Here’s the thing: the best foundation in the world won’t look good if the skin isn’t prepped properly. So, don’t skip this step!
Cleanse: Start with a clean canvas to remove any oils or dirt.
Exfoliate: If their skin is looking flaky, gently exfoliate to smooth the surface.
Hydrate: Even oily skin needs moisture. Use a lightweight, non-greasy moisturizer.
Prime: Tailor your primer to their skin type—hydrating for dry skin, mattifying for oily skin, etc.
Tip for MUA’s: Give the primer a minute to set before applying foundation. This will help it grip better and last longer.
Step 5: Test and Blend Like a Pro
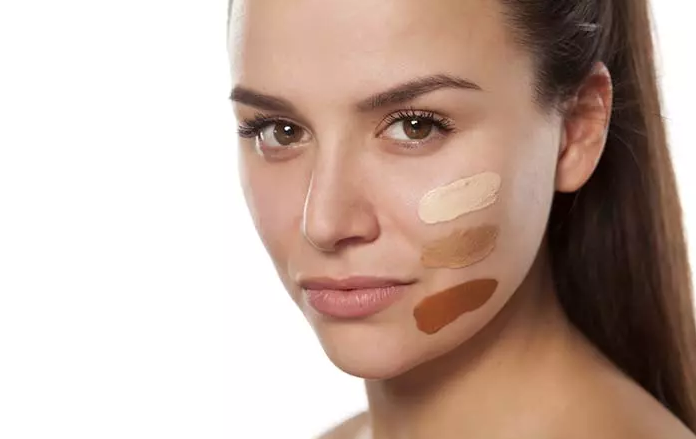
Always, ALWAYS test the foundation before committing to it. Swatch three shades along their jawline—the one that disappears into the skin is your winner.
And remember, blending is your best friend. Use a damp beauty sponge, foundation brush, or even your fingers (if the formula allows) to ensure there are no streaks or harsh lines.
Step 6: Be Ready to Mix and Customize
Here’s a little secret: sometimes, the perfect foundation doesn’t exist in a single bottle. Don’t be afraid to mix shades, finishes, or even brands to get the exact look you’re going for.
For example:
Combine a matte foundation with a dewy one for combo skin.
Mix a darker and lighter shade to create a custom color match.
Add a drop of liquid illuminator for a glowing finish.
Step 7: Think About Longevity
If your client needs their makeup to last all day (or night), choose long-wear formulas. Set it with a powder and finish with a setting spray to lock everything in place.
Step 8: Keep Skin Concerns in Mind
If your client has specific concerns—like acne, redness, or hyperpigmentation—choose a foundation that works for their needs. For example:
Acne-prone skin: Use non-comedogenic formulas to avoid clogging pores.
Redness: Look for foundations with green undertones to cancel it out.
Mature skin: Avoid heavy, cakey products. Instead, use lightweight, hydrating formulas that won’t settle into fine lines.
Step 9: Update Your Kit Regularly
As an MUA, it’s essential to keep your foundation collection up-to-date. Shades and formulas can expire, so check your kit regularly and replace anything that’s past its prime.
Step 10: Communicate with Your Client
At the end of the day, it’s all about making your client feel confident and beautiful. Talk to them about their preferences, concerns, and skin history. The more you know, the better you can tailor your foundation choice to their needs.
Foundation matching doesn’t have to feel overwhelming. With these tips, you’ll be picking the perfect shade, formula, and finish for every client in no time. And the best part? They’ll leave your chair feeling like a million bucks—without a mismatched jawline in sight.
So go ahead, channel your inner foundation whisperer, and show your clients why you’re the MUA they can’t live without. 😘