Okay, we NEED to talk about eyeshadow blending because it’s literally the difference between “Wow, who did your makeup?” and “Oh, you tried…” 😅 I know blending can feel intimidating at first (like, why does it always look patchy on me and flawless on them?!), but trust me—it’s not magic. It’s just a mix of the right tools, a little technique, and, yes, practice. But once you nail it? Game. Changer. Let’s dive in like we’re sitting down at your vanity together, okay? 🖌️✨
Step 1: Prime Time, Babe ✨
Let’s get real—if you’re skipping primer, you’re doing your eyeshadow dirty. Primer is what gives your shadow something to stick to, makes those colors pop, and keeps them from sliding into a sad little crease halfway through the day. No primer? No problem—dab on a bit of concealer and set it with powder. Boom. DIY primer. (But seriously, invest in a real one when you can—your eyeshadow deserves better.) 🎭
Step 2: Brushes Are Your Besties 🖌️
Let’s talk brushes, because girl, your fingers can only take you so far. You don’t need a crazy-expensive set, but having a few good brushes will change your life. Here’s the cheat sheet:
Fluffy blending brush: This is your go-to for buffing out colors and softening edges.
Tapered crease brush: Perfect for defining that crease without looking too harsh.
Flat shader brush: For packing on pigment when you need that color to pop.
Oh, and clean your brushes, PLEASE. Dirty brushes aren’t just gross—they’ll make your blending look patchy. Quick hack? Swirl them on a towel with some brush cleaner if you’re in a rush. Clean brushes = happy eyeshadow.
Step 3: Start Light, Go Slow 🌈
If you’re diving straight into your darkest shade, you’re already setting yourself up for a blending nightmare. Always, ALWAYS start with your lightest shade—it’s called a transition color for a reason! Think soft taupes, warm peaches, or cool beiges, depending on your palette.
Sweep it into your crease using a windshield wiper motion (you know the one). This sets the stage for everything else. Once that’s blended, move to a slightly darker shade and layer it up. Go slow—eyeshadow is a buildable moment, not a race. And trust me, it’s so much easier to add color than to erase it.
Step 4: Blend, Blend, Blend 🌀
Here’s the tea: if you think you’re done blending, you probably aren’t. 😂 Grab that fluffy brush and work those edges in soft, circular motions until everything looks seamless. The goal is to make the colors look like they’re melting into each other. No harsh lines, no awkward gaps—just pure, buttery goodness.
Feeling stuck? Use a clean brush or a dab of translucent powder to soften any areas that are being stubborn. It’s like the “undo” button for makeup.
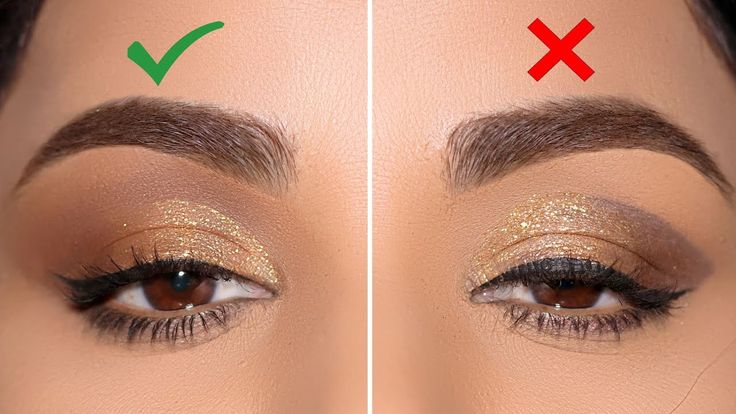
Step 5: Fix Those Edges 🌟
You know how sometimes your eyeshadow looks bomb in the middle but then kind of…falls apart at the edges? Don’t leave it like that! Take a clean blending brush and lightly buff out the outer edges. It’ll make everything look polished, even if it’s not perfect (which, let’s be honest, is totally fine).
tip: If you want a sharper look, grab some tape before you start or clean up with a makeup wipe after. Instant edge, no stress.
Step 6: Don’t Skip the Pop ✨
Here’s the fun part—adding a little extra. Take a shimmer, metallic, or even a glitter shade and pop it on the center of your lid or inner corner. This is where fingers are actually your best tool. Just pat it on for max pigment and sparkle. Trust me, this step makes ALL the difference. It’s like the cherry on top of your makeup masterpiece. 🍒
Step 7: Be Gentle ✋
Listen, blending is not about scrubbing your eyelid like it’s a dirty dish. Be gentle—your eyelids are delicate! Use light pressure, and let the brush do the work for you. Heavy-handed blending can muddy your colors, and nobody wants that.
Step 8: Practice Makes Perfect 💕
I know, I know—nobody wants to hear “practice,” but it’s true. The more you play around with different shades and techniques, the better you’ll get. And honestly? Experimenting is half the fun. Don’t be afraid to mess up—it’s just makeup. Worst case, you wipe it off and try again.
A Few Hacks Because I Love You 💖
Match your primer to your look: If you’re going bold, use a tacky base for max pigment. For soft, subtle looks, stick with something smooth and matte.
Fix patchy spots: If one area looks weird, grab a clean brush and buff it out gently. A light hand works wonders.
Lighting matters: Always check your work in natural light. What looks amazing in your bathroom mirror might need a little tweaking once you step outside.
So there you have it—the secret to blending eyeshadow like a total pro. With these tips, you’ll be creating seamless, stunning eye looks that’ll have everyone asking, “Who did your makeup?” (Hint: YOU DID. 💅) Now go grab that palette and start blending, babe. You’ve got this! ✨